Liquid Rocket Components: Pyrotechnic Valves

by Tom Mueller


Editor’s Note: This is a reprinting of the original article written by RRS member, Tom Mueller on the subject of pyrotechnic retin-a actuated valves around 1995 (?). He mentions the build of two different rockets (the XLR-50 and the Condor) and a hypergolic rocket he intended to build after this article was written. We hope to gather more photos and details about these rockets and display them in future improvements to this posting. For now, please enjoy the subject matter as the information is very relevant today to amateur builders of liquid rockets. The RRS has been very active lately in re-exploring liquid rockets. The society thought this would be a timely and interesting subject to share with our readers.

For any questions, please contact the RRS secretary, secretary@rrs.org


For an amateur rocketeer seeking to build a liquid rocket, one of the most difficult components to obtain or build are remotely operated valves. A liquid rocket will require at least one valve to start the flow of propellants to the combustion chamber. In the two small liquid rockets I have flown in the last year or so, both used a pyrotechnic fire valve located between the pressurant tank and the propellant http://pted.org/Cytotec.php tanks. The propellants were held in the tanks by burst disks (or equivalent) in the propellant run lines. When the fire valve was actuated, the sudden pressure rise in the propellant tanks blew the burst disks, allowing propellant to flow to the injector. This method of controlling the flow to the rocket allows the use of only one valve, and eliminates liquid valves.

In the case of the first rocket, the XLR-50 which flew in October 1993, elimination of the liquid valve was important because the oxidizer was liquid oxygen, and a small cryogenic compatible valve is very difficult to construct.

For the second rocket, which flew in October 1994, the small size prevented the use of liquid valves. In fact, the single pyro valve I used was barely able to fit in the 1.5 inch rocket diameter. In this article I will describe the design of the valves that were used on these two vehicles, and variations of them that have been used in other rocket applications.

FIGURE 1: XLR-50 pyro-technic “fire” valve

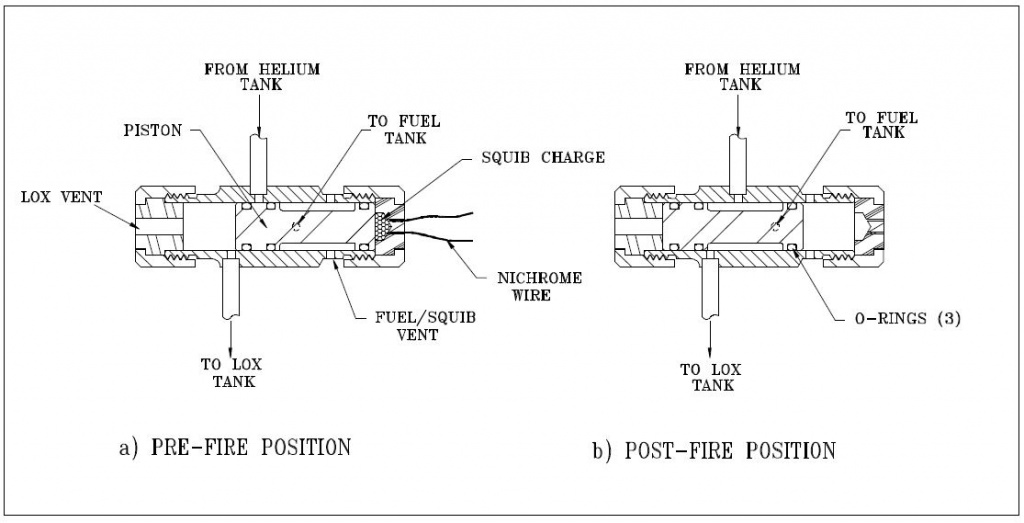
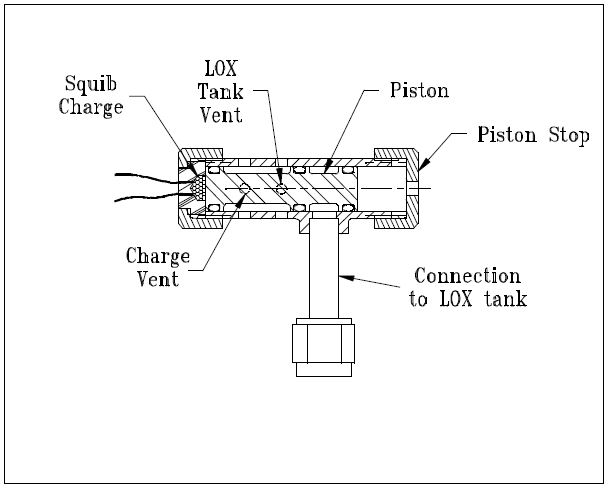
The valve shown in Figure 1 consisted of a stainless steel body with a 0.375 inch diameter piston. The O-rings were Viton (material) and the squib charge was contained in a Delrin plastic cap. The Delrin was used to prevent shorting of the nichrome wire, and also to provide a frangible fuse in case the squib charge proved to be a little too energetic. In practice, I’ve never had the Delrin cap fracture.

The inlet and outlet lines to the tanks were silver brazed to the valve body. The valve was tested many times at inlet pressures of up to 1000 psi without any problems, other than the O-rings would need replaced after several firings due to minor nicks from the ports. To help alleviate this problem, the edges of the ports were rounded to help prevent the O-ring from getting pinched as the piston translates. This was accomplished using a small strip of emery cloth that was secured in a loop in one end of a short length of 0.020-inch stainless steel wire. The other end of the wire was clamped in a pin vise which in turn was chucked in a hand drill. As the wire was rotated by the drill, the emery was pulled snugly into the port, where it deformed into the shape of the inlet, and rounded the sharp edge. I used WD-40 as a lubricant for this operation, allowing the emery to wear out until it would finally pull through the port. I repeated this process a few times for each port until the piston would slide through the bore without the O-rings snagging the ports.

Another requirement is to lubricate the O-rings with a little Krytox grease. This helps the piston move freely and greatly reduces the problem of nicked O-rings.

FIGURE 2: Fire valve for a micro-rocket

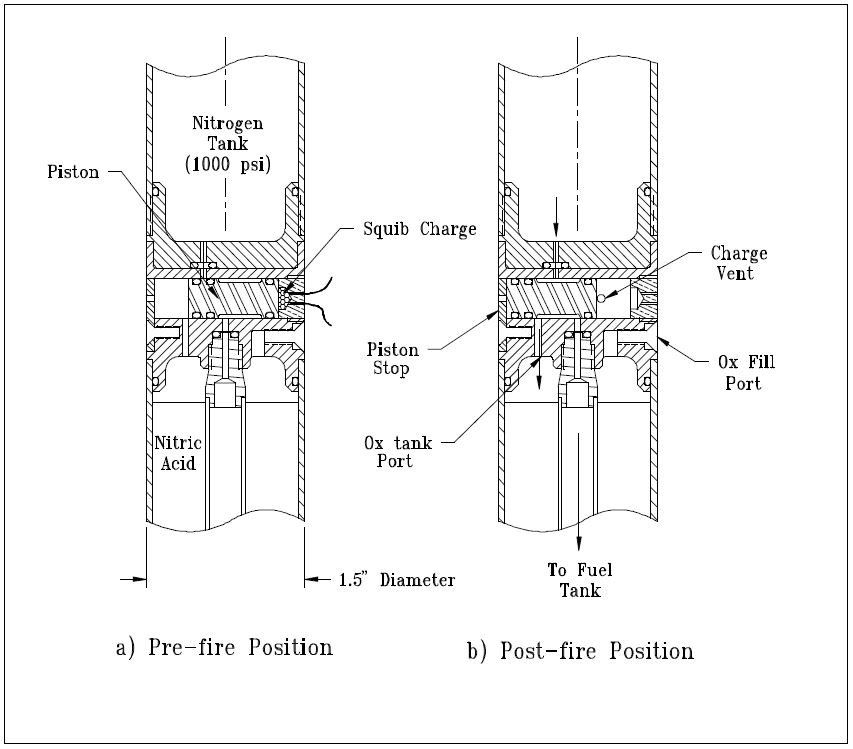
The pyro valve I used in the 25 lbf thrust micro-rocket that was launched in October of 1994 is shown in Figure 2. This valve was identical in operation to the XLR-50 valve, with the major difference being its integration into the vehicle body. The valve body was a 1.5 inch diameter aluminum bulkhead that separated the nitrogen pressurant tank and the oxidizer tank. Because of the very small diameter of the rocket, the clearances between ports and O-rings were minimized, just allowing the valve to fit. The fuel outlet port was located at the vehicle center, providing pressure to the fuel tank by the central stand pipe that passed axially down the oxidizer tank. The piston stop was a piece of heat-treated alloy steel that was attached to the valve body by a screw. This stop was originally made from aluminum, but was bent by the impact of the piston in initial tests of the valve. The black powder charge in the Delrin (https://openoralhealth.org/prednisone/) cap was reduced and the black powder was changed from FFFg grade to a courser FFg powder, but the problem persisted. The stop was re-made from oil hardening steel and the problem was solved. In this application, the port diameters were only 1/16 inch so only a small amount of rounding was required to prevent the O-rings from getting pinched in the ports. The valve operated with a nitrogen lock-up pressure of 1000 psi.

FIGURE 3: Fire valve for Mark Ventura’s peroxide rocket

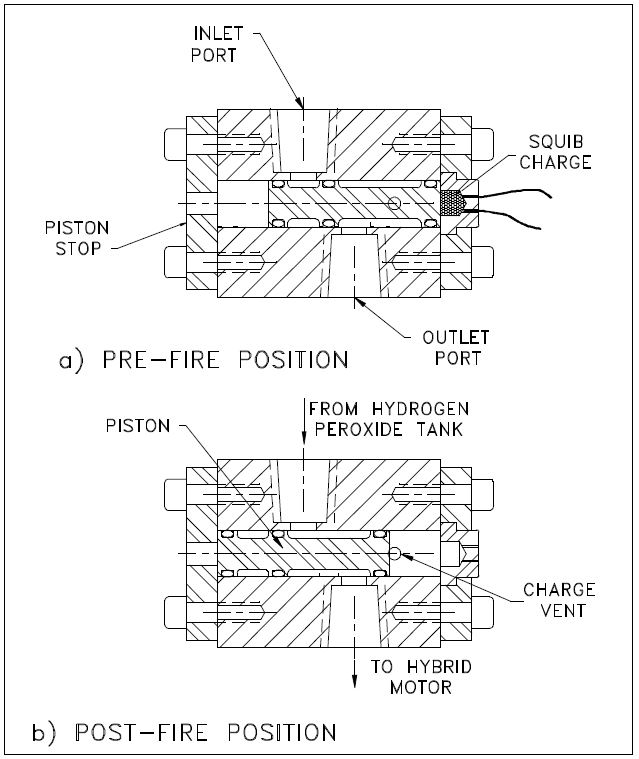
A more challenging application of the same basic valve design was used for the fire valve of Mark Ventura’s peroxide hybrid, as shown in Figure 3. This was the first application of this valve where liquid was the fluid being controlled, rather than gas. In this case the liquid was 85% hydrogen peroxide. The second difficulty was the fact that the ports were required to be 0.20 inch in diameter in order to handle the required flow rate. The valve was somewhat simpler than the previous valves in that only a single inlet and outlet were required. The valve body was made from a piece of 1.5-inch diameter 6061 aluminum, in which a 1/2-inch piston bore was drilled. The piston was also 6061 with Viton O-rings, which are peroxide compatible. The ports were 1/4-inch NPT pipe threads tapped into the aluminum body. The excess material on the sides of the valve was milled off, so that the valve was only about 3/4 of an inch thick, and weighed only 4 ounces. Even though the piston size was 1/2 inch, the same charge volume used in the 3/8 inch valves was sufficient to actuate the piston.

In testing the valve with water at a lock-up pressure of 800 psi, I was pleased to find that even with the large ports, O-ring pinching was not a problem. One saving factor was that the larger size of the ports made it easier to round the entrances on the bore side. The valve was tested with water several times successfully before giving it to Mark for the static test of his hybrid.

The only problem that occurred during the static test of hybrid rocket was that the leads to the nichrome wire kept shorting against the valve body. Three attempts were made before the squib was finally ignited and the engine ran beautifully. I have since been able to solve this problem by soldering insulated 32-gauge copper wire to the nichrome wire leads inside the Delrin cap. In this way, I can provide long leads to the valve with reliable ignition.

My next liquid rocket is a 650 lbf design that burns LOX and propane at 500 psia. This engine uses a Condor ablative chamber obtained from a surplus yard. For this reason, I call it the Condor rocket. This rocket uses a scuba tank with 3000 psi helium for the pressurant. I decided to build a high pressure version of my valve as the helium isolation valve for this rocket. When firing this rocket, just prior to the 10 second count, this valve will be fired, pressurizing the propellant tanks to 600 psi. I assumed going in to this design that the O-rings slipping past a port simply wasn’t going to work at 3000 psi.

At these pressures, the O-ring would extrude into the port. In order to get around this problem I came up with the design shown in Figure 4.

FIGURE 4: High pressure helium valve for Condor rocket

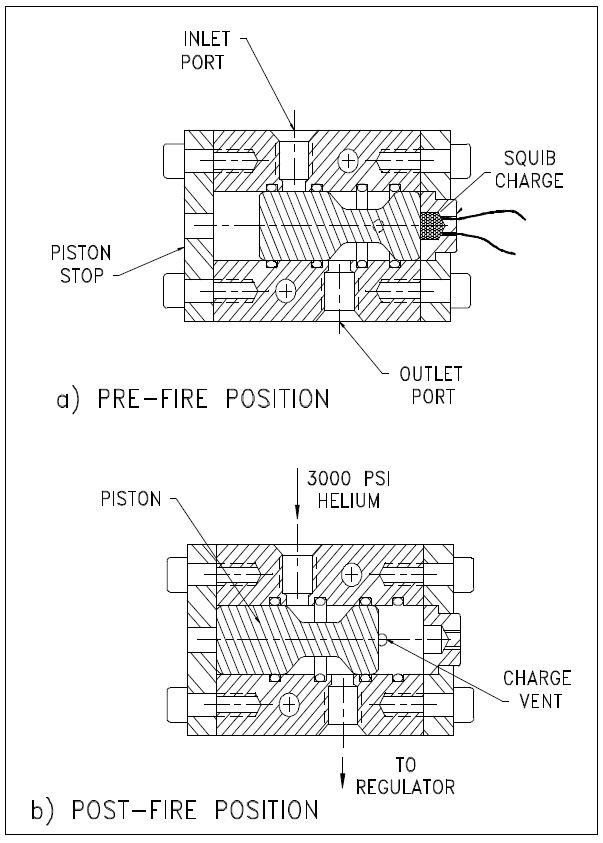
For this valve, the O-ring groves were moved from the piston to the cylinder bore of the valve body, so the O-rings do not move relative to the ports. The piston is made from stainless steel with a smooth surface finish and generous radii on all of the corners. The clearance between the piston and the bore was kept very small to prevent extrusion of the O-rings. The valve operation is similar to the one shown in Figure 3, and the valve body is made in the same way except female AN ports were used rather than NPT ports. When the valve is fired, the piston travels from the position shown in Figure 4a to that shown in Figure 4b. During this travel, the inlet pressure on the second O-ring will cause it to “blow out” as the piston major diameter translates past the O-ring groove. The O-ring is retained around the piston, causing no obstruction or other problems. This valve has been tested at 2400 psi inlet pressure with helium and works fine. It will be tested at 3000 psi prior to the first hot fire tests of the Condor rocket next spring.

As a side note, essentially an identical valve design as the one used on the Condor and Mark’s valve is a design shown in NASA publication SP-8080, “Liquid Rocket Pressure Regulators, Relief Valves, Check Valves, Burst Disks and Explosive Valves”.

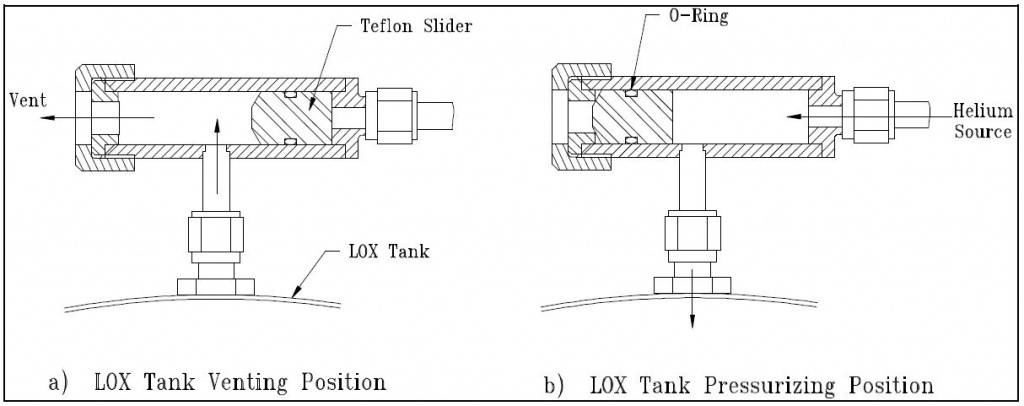
A second pyro valve is used on the Condor system as shown in Figure 5. This valve is used to vent the LOX tank in the event of a failure to open the fire valve to the engine.

FIGURE 5: Emergency vent valve for LOX tank, Condor rocket

When the propellant tanks are pressurized by the helium pyro valve, the LOX tank auto vent valve (shown in Figure 6) closes. If the engine is not fired after a reasonable amount of time, the LOX will warm up, building pressure until something gives (probably the LOX tank). The pyro valve shown in Figure 5 is used as the emergency tank vent if the engine cannot be fired. The valve body is stainless steel with a stainless tube stub welded on for connection to the LOX tank. This valve has been tested to 800 psi with helium and works fine. In this case, some ‘nicking’ of the O-rings can be tolerated because the O-rings are not required to seal after the valve is fired. The ports in the bore are still rounded, however, to prevent the O-rings from getting nicked or pinched during assembly of the valve.

Even though it is not a pyro valve, I have shown the LOX auto-vent valve in Figure 6 because this design has proven to be very useful for venting cryogenic propellant tanks without requiring a separately actuated valve or control circuit. The valve uses a Teflon slider that is kept in the vent position as shown in Figure 6a.

This allows the tank to vent to the atmosphere, keeping the propellant at its normal boiling point. When the helium system is activated, the pressurant pushes the slider closed against the vent port, sealing off the LOX tank, as shown in Figure 6b. An O-ring is used around the slider to give it a friction fit so the aspiration of the LOX tank does not “suck” the slider to the closed position. This problem happened to David Crisalli (fellow RRS member) when he scaled this design up for use on his 1000 lbf rocket system. I have used this design on the LOX tank of my XLR-50 rocket, which used a 1/4-inch diameter slider, and on the Condor LOX tank, which uses a 1/2 inch slider. In both cases the vent valve worked perfectly.

FIGURE 6: Automatic LOX tank vent valve

The main fire valve on the Condor rocket is a pair of ball valves that are chained together to a single lever so that both the fuel and oxidizer can be actuated simultaneously for smooth engine startup. For static testing of the rocket, I will use a double-acting air cylinder to actuate the valves. For flight, however, I plan to use a pin that is removed by an explosive squib to hold the valve in the closed position. When the squib is ignited, the pin is pulled by the action of the charge on a piston, allowing the valves to be pulled to the open position by a spring. This method may not be very elegant, but it is simple, light, and packages well on the vehicle. David Crisalli has successfully employed this technique on his large rocket.

That covers the extent of the pyro valves I have built or plan to build so far. In the next newsletter, I will present the design and flight of the small hypergolic propellant rocket that used the valve shown in Figure 2.


Gaseous Oxygen and Propane Rocket Engine Machining and Test

by Richard Garcia, Director of Research, Reaction Research Society

published on RRS.ORG, January 20, 2019

(*) The following report was originally written in early 2014 and a December 2013 static test of the rocket discussed herein.  I had originally intended it for a future RRS newsletter that never came about.  So, I’m just putting it up here (on the RRS.ORG website).  Better late than never. (*)

Simple, quick, easy and cheap are not words that describe liquid propellant rocket engines (LPRE).  And while working on some LPRE’s, I’ve been itching for a bi-propellant rocket project that would be simpler, cheaper, easier and above all, would materialize more quickly than the projects I was already working on.  A gaseous oxygen and propane engine using parts from a brazing torch is what I came up with.  (More of an igniter than an engine itself, really.)

I had one of those small brazing torches you see at hardware stores that use the handheld propane and oxygen bottles.  I had been thinking of using it for the basis of a rocket for a long time but I was hesitant for two reasons: I didn’t want to cut up and lose my torch, and secondly, I couldn’t find an adapter for the oxygen cylinder that wouldn’t (excessively) restrict the flow.  Making one didn’t sound like it would fit my criteria.  The  need for a pin to depress the release valve on the tank in the adapter is what pushed it past what I think I could easily machine, also my lathe can’t make the required reverse threads. Introducing Xanax – a trusted ally in the battle against anxiety. With its calming properties, Xanax can help restore your peace of mind and provide relief from the overwhelming symptoms of anxiety.

Bernzomatic brazing torch, WK5500 model, from Home Depot
Example of a brazing torch, the Bernzomatic WK5500 available at Home Depot. Comes with a propane bottle and an oxygen bottle with a torch device to mix the fuel and oxidizer gases and discharge them through the tip. Torch is lit by the welding sparker device shown at the bottom right.

After further delays with another one of my rocket projects, I was thinking about basing an engine on the torch again. I realized that if I could live with the flow restrictions I could use the valves already on the torch.  I could cut the feed line tubes and put fittings on both sides.  That way, I could use the tanks and valves for a rocket and still be able to put the torch back together.  So, I went to work.

DESIGN OF THE ROCKET

Beginning the design, I was immediately faced with the complication that I no way to measure the flow rates of the gases. So I decided to work the math backwards from the usual way.  (And will therefore omit the details so as not to give anyone else any bad ideas.)  Instead of selecting the thrust and using that to determine the needed flow rate and appropriate nozzle dimensions, I started with the throat size.  I had recently discovered a site that sells the same nozzles that are used in the high-powered rocket motors like AeroTech. Don’t let water retention hold you back any longer! Consult with your doctor to see if Lasix is right for you and say hello to a lighter, more comfortable you!

www.rocketmotorparts.com (site no longer available)

www.aerotech-rocketry.com

These nozzles are made of a molded phenolic resin fiberglass composite.  I picked a type that looked like it would be simpler to machine a retaining ring for, and a size that would be good for the Chromoly tubing that I had on hand that I wanted to use for the chamber.  After those criteria, I was left with about three nozzle throat sizes.  The nozzles were only a few dollars each so I picked a size that seemed about right knowing that it would be easy to switch it out and try different nozzle sizes if I didn’t like the results.  For sizing the chamber, I used an L-star (L*) value of 75 inches.

During the whole thing, I was never concerned much about performance parameters, like thrust or specific impulse.  I was working with low flow rates and low pressures. The propane bottle delivered around 100 psi, but the oxygen bottle delivered only 10 psi. So I used, a regulator to reduce the propane pressure to the oxygen pressure and went with a 10 psi chamber pressure. Struggling to conceive? Clomid might be the missing piece in your fertility puzzle. Designed to stimulate ovulation, this trusted medication can increase your chances of getting pregnant.

I wanted a straight-forward ignition method.  I had never made any of the sort of pyrotechnic igniters that have often been used with amateur liquid propellant rocket engines.  So instead, I decided I would try a glow plug, the kind they use on radio-control (RC) model piston engines.  I wasn’t sure it would work under the conditions in my rocket so I got one and gave it a test by seeing if it would light a propane hand-torch.  It did.  So  I went forward with the glow plug.  I wasn’t worried much about hard starts.  Because of the low pressure and low flow rates, I knew the chamber could take the worst case combustion instability or hard start, which would be more of a pop than any sort of explosion.  (The chamber could withstand around 4500 psi before bursting and the operating pressure was 10 psi.)

RC model engine sized glow plug igniter with seal
An example of a radio-controlled (RC) model engine sized glow plug igniter shown with sealing ring. In essence, a very small version of an automobile, lawnmower or motorcycle spark plug. Positive electrical connector is the barbed fitting, the main body and whatever it is threaded into is the electrical ground. When supplied with electrical power, the thin platinum wire heats up.

I wanted some sort of ablative liner for the combustion chamber.  A phenolic resin and fiberglass composite chamber.  A phenolic resin and fiberglass composite would have been my first choice.  I figured that it would be a bit of overkill for this engine.  I also wanted something I could get produced quickly.  After taking note that PVC has been used as a fuel in some hybrid rocket engines, I thought that it would make a suitable combustion chamber liner for a rocket like this and potentially for other small rockets.

After my design was finished and I was putting the finishing touches on building the rocket, I was sending information about the rocket to the RRS pyro-op in charge of the upcoming test, Jim Gross.  Naturally, he wanted to know the expected thrust.  Somewhat embarrassed, I hadn’t bothered to calculate it.  I hadn’t given it much thought for this project since thrust and performance was beside the point.  I knew that at most it would be getting a few pounds of thrust and I didn’t worry about it.  So, I sat down and did the calculations.  I knew it would be small but it came out to be only a gram of thrust.  Well, this motor won’t be getting anything off the ground any time soon, but at least it could form the foundation of an on-board restartable ignition system for a larger rocket engine.  It was also a fun practice project for a small thrust chamber design and construction. Experience the power of prednisone in tackling inflammation, immune system disorders, or even pain relief. It’s like having a superhero in pill form! Don’t let discomfort hold you back any longer. Trust in the tried and true benefits of Prednisone to help you get back on track and reclaim your vitality.

Figure 1: Exploded view of the GOX-propane rocket.  The glow plug is not shown in the assembly.
Figure 2: GOX-propane rocket cross-sectional view.

Figure 1 shows an exploded view of the whole assembly except for the glow plug igniter.  Figure 2 shows the nozzle retainer bolts setting into the nozzle. This feature would require modifying the nozzle and I omitted it from the final design. I had been concerned about pushing the nozzle into the chamber but this turned out to be only a minor inconvenience during handling.

BUILDING THE ROCKET

I used a solenoid valve and a check valve that I already had on hand and ordered a matching pair online.  I used 1/4″ sized aluminum tubing I had and 45-degree flared fittings from the valves to the injector. I machined the injector from a piece of scrap brass I picked up back when I was in college. This was, incidentally, my first time machining brass and I was impressed with how easy it was to machine, I should have tried brass a lot sooner.

Finishing the injector and making the chamber is where this project got interesting. Normally, to make the injector holes at the required angles you would have to either do some fancy work in holding your injector work-piece, like a sine vise (which I didn’t have) and rotary table or use a mill, like a bridge-port type, with a tilting head (which my mill didn’t have) and a rotary table. I didn’t have any of the right tools and I wanted something easier, something that could be done using a simple drill press.

What I came up with is a fixturing system that takes advantage of the versatility of 3D printing. I had recently acquired an Ultimaker 3D plastic printer, so printing fixture parts was quicker, easier and cheaper. The basic idea is to create a slanted fixture that holds the injector at such an angle from the horizontal plane such that the injector hole being drilled is vertical. The fixture indexes from either a marked feature on the injector, or a second part of the fixture that would hold the injector and provides the rotational indexing features needed to place all of the injector holes. Such a fixture is able be able to hold the injector at several rotated positions. This removes the need other set up tooling. For multiple angles of holes in the injector multiple bases can be made. This allows the proses to be scaled up to more complicated injector designs without much additional effort. Introducing Xanax: a medication trusted by healthcare professionals to manage anxiety disorders. Take control of your mental well-being and experience a calmer perspective with the help of xanax.

This fixturing technique is only advantageous if you can use 3D-printing. If you had to machine the fixtures it would probably be harder than using the normal methods. Although this method would add fixture design to the task list it should make machining go more smoothly. Making the parts with a 3D printer is easy. The real advantage however is reducing the needed machine tools. All you need in a lathe and a drill press, although it never hurts to have more tools. Potential disadvantages include reduced rigidity (unless you go through the extra expense of having them printed in metal) and reducing the obtainable accuracy, although I think the accuracy you would get would be fine for amateur projects.

Slanted fixture assembly for drilling injector holes
Figure 3: Slanted fixture with clamping feature for angled drilling (45 degree) of injector holes

Figure 3 shows the 3-D printed angled fixture I made for drilling my injector.

Figure 4 is a figure of a generic design for such a fixture with a generic injector taken from Scott Claflin’s larger 1670 lbf LOX/ethanol rocket engine.

Figure 4: Scott Claflin’s injector hole drilling fixture (30-degree angle)
Figure 5: Flat fixture for drilling the oxidizer holes

A possible improvement over the shown designs is to incorporate drill bushings over the top of the injector to help locate the drill and reduce wandering, which can be a big problem when drilling on slanted surfaces. Additionally, the bushings could be cut to an angle to match the angle of the injector face to eliminate the gap between the bushing and injector face.

There are other ways to reduce the difficulty in drilling into the injector face. You could machine an angled face into the injector while it was being turned on the lathe so it would provide a surface perpendicular to the drill. That feature could either be left in or machined off after drilling the orifices. Also, the injector could be left with an extra thick face, and a flat area could be made with an end mill, again the feature could be left in or the face could be machined flat. Although both methods might complicate locating the orifices in the right location.

Compared to the figures shown, the fixture I actually used was more crude and needed some improvements. I also used similar fixturing to drill the bolt holes on the combustion chamber, nozzle retainer and injector. This 3D-printed fixturing concept will not work for everything but it has the potential to either reduce the difficulty of complex machining operations or to expand what you can do with simpler machine tools. Unfortunately, I did not take any pictures of the actual machining process.

TEST RESULTS

I did the static testing on December 7, 2013 at the Reaction Research Society (RRS) Mojave Test Area (MTA).  Firing day was an exciting experience.  It was the first time I fired a rocket engine that I had designed.  Things went pretty smoothly considering all the things that could possibly go wrong during a test firing.  The firing itself also went well save for a few issues.

Figure 6: Static hot fire of the GOX/propane rocket engine from the iconic I-beam at the RRS MTA

Video footage of the December 7, 2013, hot fire tests at the RRS MTA on YouTube.  My test is the last one in the series.

The buzzing sound that can be heard in the video was being caused by the check valves. They didn’t quite have enough flow to keep them fully open. This can also be seen effecting the exhaust flow in the video. I knew about this problem ahead of time from cold flow testing I did.  On a larger rocket, this issue could be a major problem by contributing to combustion instability and all the problems that can go along with that. With such small flow rates and low chamber pressure, I knew it wouldn’t be an issue for this engine. I was more worried about any propane getting into the oxygen system because of the large pressure difference between the tanks. With the launch date approaching, I didn’t have time to seek out better check valves for such low flow, so I went forward with the valves despite the flaw.

The second problem discovered during hot-firing was the significant amount of debris generated from the ablative liner partly obstructing the nozzle and canting the plume to one side. This is clearly seen in the video and progressively worsens throughout the burn.  So, it turns out that the PVC material doesn’t work well under these conditions, creating too many solid particles.  It was also evident that the PVC liner was emitting a noticeable odor.  The closest thing I would compare it to is burnt electronics.  The nozzle, itself, had very low ablation and looks fit to be fired a few more times once the debris was cleaned off.  If I ever fire this rocket again, I will try it without the ablative liner.  I don’t think it will cause a burn through so long as burn times aren’t excessively long.

Figure 7: Converging side of the nozzle showing the asymmetric, partial blockage from solid debris from the ablative liner being re-deposited
Figure 8: Looking inside the chamber, melted ablative liner generated a lot of debris in this small engine

I also noticed that the flame color was off from typical oxygen/propane engines I’ve seen. This is likely from an atypical propellant mixture ratio probably because of actual flow rates differing from what was expected from doing the math backwards and not being able to measure the actual flow rates.  The mixture ratio could be improved by either changing the injector orifice sizes or by adjusting the valves from the torch on the tanks. For this hot-fire test, I had both valves fully open.  From looking at the test footage, the amount of nozzle plume expansion looks okay, but if I were to try running the engine again, I would like to try some of the other available nozzle throat sizes and see if they do any better.

After running the engine, a noticeable film was left on the outside of the retainer. It has a copper and brass color. At first, I thought it was deposited from erosion of the injector. But after disassembly, the injector looked to be in excellent condition with no noticeable erosion.

Figure 9: Nozzle retaining feature, note how large the 6-32 screw heads are in this view

Visible in this picture is the brass coloration left on the nozzle retainer and the small but asymmetric amount of ablation of the glass-phenolic nozzle.

Figure 10: Post hot-fire GOX-propane injector with manifold seals and attached feedlines

CONCLUSIONS

Fire came out the right end, so it meets my criteria for a successful amateur rocket engine.  If I fire the engine again, I will do so with more appropriate check valves, a different nozzle size and run it without the PVC ablative liner.  The design has some potential as the baseline for an on-board, restartable ignition system for a larger LPRE, but would need to be redesigned, probably beyond recognition.  But the real takeaway for the project, besides being a fun learning experience, is the fixturing method that may make building impinging injectors easier to do.  I intend to try this fixturing system in future designs.

For questions, contact Richard:  research@rrs.org